How to make a trestle table

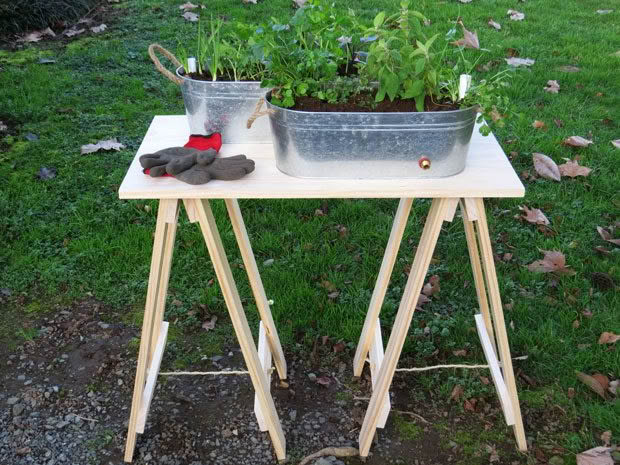
This trestle is ideal for a compact potting table or a base for a plant container.
Materials required:
● 1 x 800mm x 450mm laminated panel
● 4 x 40mm x 18mm x 235mm dressed timber
● 8 x 380mm x 65mm x 18mm dressed timber
● 8 x 720mm x 65mm x 18mm dressed timber
● 40 x 32mm screws
● 2 x packets of 64mm butt hinge (two hinges per pack)
● 24 x 16mm screws
● 5mm x 1.5m sisal rope

Trestle table Instructions:

1.
STEP 1
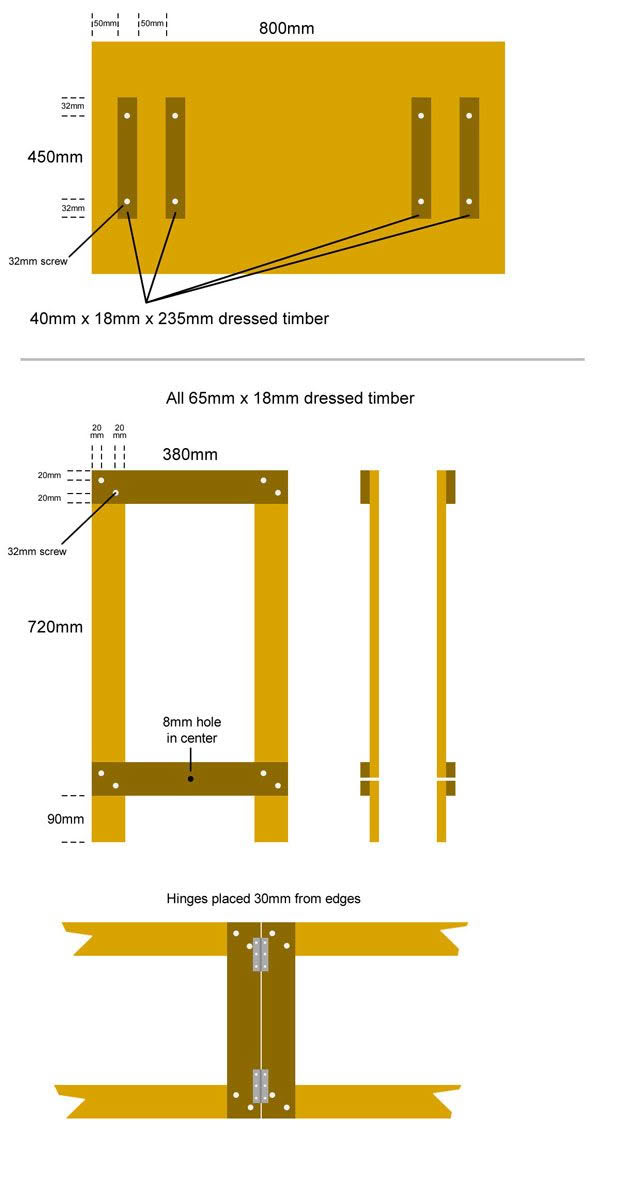
Measure and cut wood to size: 1 x 800mm x 450mm sheet (for tabletop); 4 x 235mm dressed timber battens (for underside of trestle tabletop); 8 x 380mm (horizontal supports for trestle legs) and 8 x 720mm (vertical supports for trestle legs).

2.
STEP 2.
Sand any burrs from the edges of the wood to avoid splinters.

3.
STEP 3.
Create a jig from a spare piece of wood as a guide for pilot drill holes – an optional but handy step that will be useful when screwing horizontal supports to vertical supports of trestle legs.

4.
STEP 4.
Lay two vertical supports flat and parallel on the ground, and place two horizontal supports: one squared to the top of the verticals, and the second 90mm from the bottom. Square up, drill pilot holes and secure in place with 2 x 32mm screws per join. Repeat for remaining verticals/horizontals. There will be 4 frames in total.

5.
STEP 5.
Place two completed frames together flat on the floor, top end to top end. Secure hinges to adjoin the top of frames with 16mm screws, arranging the hinges 30mm from each side. Repeat with two remaining frames, resulting in the completion of both trestle legs, each hinged at the top.

6.
STEP 6.
In the centre of lower horizontal supports, drill a 6mm hole for a rope tie. Tying the rope in place will mark the final part in completion (see later).

7.
STEP 7.
Take the trestle top sheet of wood and lay the “good” side face down. Place 1 x 235mm batten of dressed wood 50mm from one short edge in the centre and secure with 2 x 32mm screws. With a 50mm gap, place another 1 x 235mm batten parallel to it. Secure in place with 2 x 32mm screws. Repeat on the other short side with remaining 2 x 235mm lengths. These wooden battens become “stoppers” and will prevent the trestle legs from moving unexpectedly once there is weight on the tabletop.

8.
STEP 8.
Place a trestle leg into the space provided by each set of stoppers. Ensure enclosed legs fit snuggly. Adjust and reposition screw, if required.

9.
STEP 9.
Flip the tabletop over, nestle the upright trestle legs in place. Splay trestle legs to height of choice, then tread rope through pre-drilled holes and tie off.
The self-watering pot project photographed above is published in our special edition In Your Backyard: Living Lightly.


