How to build a chicken coop with a living roof

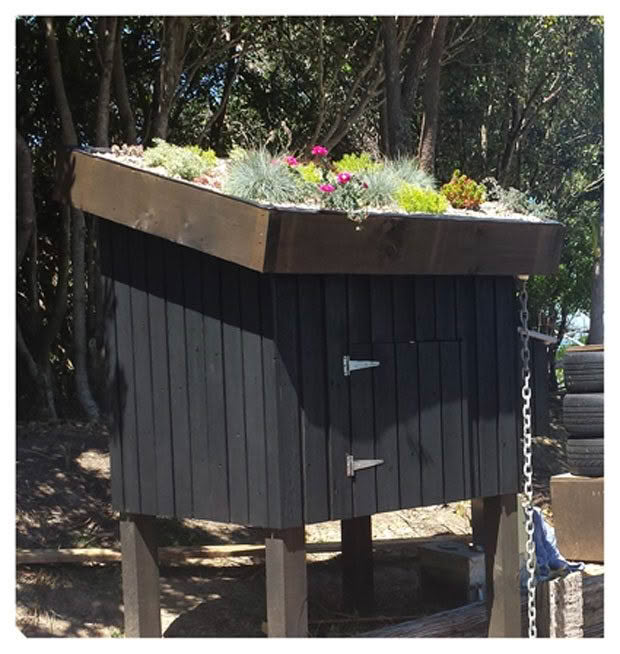
A DIY guide to creating a chicken coop with a green roof. Building a chicken coop with a living roof is a way to keep chickens cool during summer.
Words, research & design by Renee Davies, Dean of Engineering & Construction and Infrastructure at Auckland’s Unitec.
A living roof is an attractive and an ecologically beneficial feature on garden structures such as sheds, garages, chook houses and letter boxes. These small-scale projects are easy so long as some general principles are followed. Large scale projects will probably require advice from specialist firms.
BENEFITS OF A LIVING ROOF
Rainwater Management
The immediate water run-off from a roof can be reduced by 50–90% depending on the living roof design. The plants and substrate slow runoff by absorbing water thus greatly reducing drainage flow rates.
Improves the Microclimate
A living roof will cool and humidify the surrounding air and can create a beneficial microclimate within their immediate area.
BASIC PRINCIPLES OF A LIVING ROOF
Weighty issues
Simple lightweight living roofs weigh between 60-150 kg/m2. If you are unsure of the loading the roof can take, consult an architect or structural engineer before you do anything else.
If the existing roof is unable to take the extra weight, consider reinforcing it with additional supports.
The Structure
Small scale living roofs require four layers:
a waterproof membrane
drainage
substrate (soil mixture)
plant layer
Waterproof membrane
Most existing structures such as sheds will have a waterproof roof (tin, plywood or bitumen). However, living roofs require an additional layer of waterproofing in a material which plant roots cannot penetrate. A heavy-duty pond liner is ideal.
Drainage
Drainage is important as excess water (not absorbed by the substrate or plants) must be able to leave the roof. Use pebbles or pumice as a base layer to allow drainage to the low point of the roof.
Substrate and planting
The depth of the substrate (soil) will guide what type of plants can be grown. Most DIY roofs have a depth of 70–200mm. In 70mm–100mm depth. With a depth of 150mm or more, you can use hardy low-growing New Zealand native plants. Sedums and succulents are best.
The substrate needs to be lightweight and low in nutrients. A good mix would consist of 30% fine pumice or vermiculite, 30% larger pumice and 40% organic soil mix.
Frame for the living roof
The living roof is contained within an upright frame around the edge of the roof. The simplest version is made of timber but any rot-resistant material can be used. If the slope of the roof is over 20° you will need to ensure the living roof does not slip. Use wood or metal battens laid over the waterproof membrane to hold the soil at regular intervals.
Maintenance
A living roof shouldn’t require too much maintenance. During a dry summer plants may need water (especially while they are still establishing their root system) and keep an eye out for weeds that might have established. Keep drainage lines clear from debris.
HOW TO BUILD A GREEN ROOF CHICKEN COOP
Materials
Choose materials which match your house or use what recycled materials you can find.
Plywood or weatherboard for cladding and nest boxes (approximately 5 square metres)
20mm Plywood for base of chicken house (approximately 1.2 x 1.0m)
20mm plywood for roof of chicken house (approximately 1.4 x 1.2m)
4x 100 x 100 ground treated posts
Plywood or ground treated timber for ramp with small off cuts of 20 x 20mm timber for grips on ramp
Lengths of framing timber eg. 100 x 25mm (approximately 10 lineal metres)
200mm x 50mm timber for edge of living roof (approximately 4.5 lineal metres)
Hinges for door and nest box lid
Black Polythene pond liner for the living roof waterproof layer and a mat on chook house floor (removable for ease of cleaning out wood shavings and droppings) and to cover plywood cover over nest boxes (to waterproof)
Drain coil (approximately 1.2 lineal metre) for drainage on living roof
Large grade pumice for drainage layer of living roof
Pumice, soil, perlite mix for substrate on living roof
Concrete for securing posts into ground
Latch for door
Chicken mesh for air vent
Branch for perch
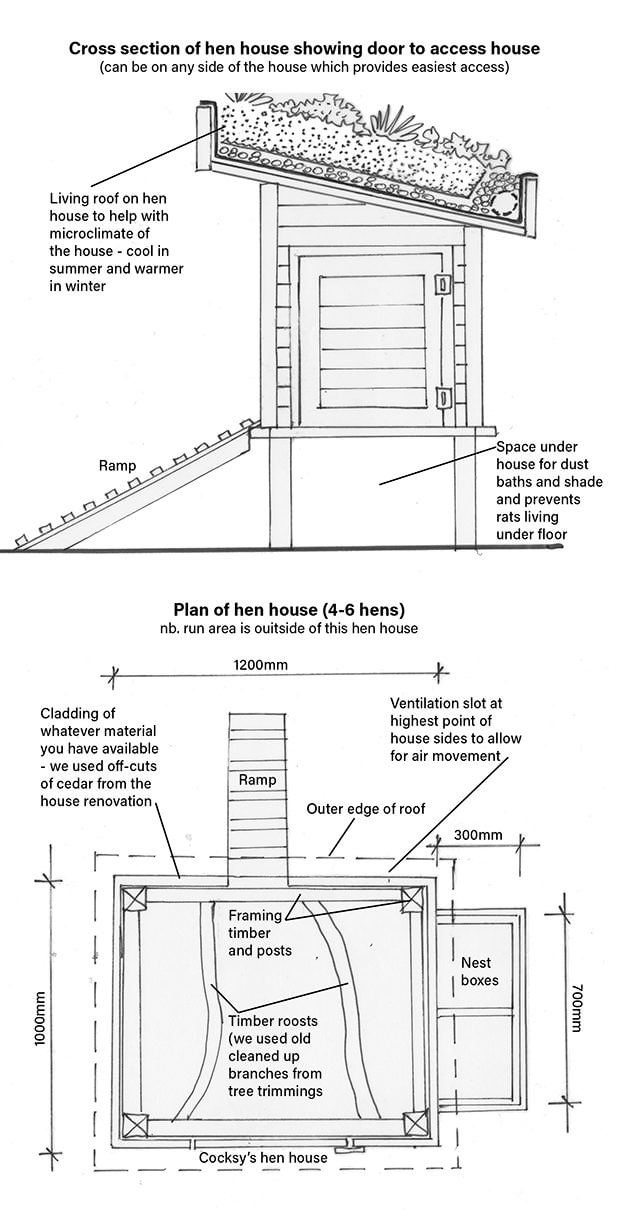
PLANS

CHICKEN COOP FUNDAMENTALS
* Chickens need shelter (from sun and predators such a hawks), a roost on which to perch and sleep at night, a box in which to lay eggs, a rat-proof feeding system, a clean water supply, an easily cleaned environment and somewhere to scratch and forage.
*Roosting poles should be 5cm wide with rounded edges and allow 5-25cm of space per bird side-to-side and 25cm between poles if more than one is required.
* Provide a nest box for every four or five chickens, raised off the ground but lower than the lowest roosting pole.Nest boxes should also be dark and cosy as hens like to lay their eggs in a safe place.
* Ideally, a chicken coop is predator-proof from dogs, cats, rodents and possums. However, in many places this is neither necessary nor possible. Asses the risk and take the required precautions.
*Coops need good airflow to prevent respiratory diseases. Design your coop so it can be taken apart for regular cleaning and dusting with an anti=red mite treatment such as DE (diatomaceous earth) and create a pull-out droppings tray under the roost area. Use fresh untreated wood shavings in nest boxes and replace every few weeks. (Great compost).
*Free-ranging chickens will eat insects, seeds and plants indiscriminately especially vegetables if not fenced off. So get prepared and fence off parts of the garden that need to be protected from chickens.
*Use a self-feed dispenser for the chicken feed as this deters rodents. And design or buy a self-fill water system which will provide your chickens with a week’s worth of clean water.

