5 fencing jobs you can do yourself
Anyone can build a fence, but it’s a science and an art to build a good quality fence.
Words: Nadene Hall
The nicest fence on my block runs for almost 200m, is dead straight, and I had nothing to do with its construction. That it’s perfect was down to local fencing contractor Tim Pope and his crew, who efficiently put in several fence lines (posts, wire, mesh) and re-nailed hundreds of wonky battens in just a few hours.
There were two important differences between the fences Tim put in and the ones my Dad and I did ourselves. Firstly, Tim and his crew used a tractor-mounted post rammer, saving time and giving every post a very firm base. Dad and I used a post hole borer and then rammed the backfill around each post by hand. Our posts have moved due to inadequate ramming and the inherent weakness of doing it by hand. I’ll let you guess who was backfilling.
Secondly, Tim used a length of wire from strainer to strainer, providing a neat, straight guide for all the other posts, and by then clipping the mesh to that guide wire, there is no sagging. We didn’t and as a result our mesh fence sags about 100mm lower in the middle where animals have leaned on it, and also looks ugly.
Being a good fencer is not an impossibility but it is worth doing right first time.
TOOLS OF THE TRADE ON A BUDGET
Level/spirit level – it doesn’t have to be an expensive one, or even a long one (mine is just 25cm and was in the $5.99 bargain bin at Mitre 10), although the 1m-long ones are less likely to get lost in the grass and are more accurate (length helps).
Stringline – you can buy coloured string on a stick for about $15, although if you’re doing a long length of fence, you can use a length of fencing wire.
Tape measure – you can get these cheap but I recommend having one at least 8m long, preferably longer, and you do get what you pay for.
Post hole shovel or hand borer or post hole borer (mechanical or tractor-mounted) or a post rammer (tractor-mounted) – you don’t need a mechanical post hole borer if you’re only doing a few posts but it really does help (your back) if it’s any more than that. You can hire a one person post hole borer for about $50 a half-day, or get a contractor in to just ram posts.
Rammer – something heavy but narrow enough to fit between the post and the sides of the hole, to ram the backfill around the post; I’ve previously used a piece of solid steel bar, a wrecking bar and the handle of my shovel.
1. PUT IN A POST
If I could give you one tip, it would be to check your levels and measurements throughout the process. My first post was 30mm higher than the rest and about 20 degrees off level. It’s a good thing Dad is handy with a sledgehammer.
1. Run your guide wire or string line -a straight fence is neater and, more importantly, stronger.
2. Measure out the distance between posts – this can be from 3-4m on an 8-wire post and batten fence, 5m for a 3-wire electric fence, up to 8m for 1-wire electric fence. If you-re extending a fence on your property, copy the spacings on fences you already have standing.
3. Dig your hole. Most standard fence posts are 1800mm long, 1200m of which needs to be above ground and 600mm (or so) in the ground. If you are digging the hole by hand (note, this is hard work!) try to keep the sides straight, and keep one side up against the stringline – this way you can jam the post up against a firm side of soil and then ram the backfill around it on three sides only.
4. Measure the depth of your post hole to make sure it’s right, then place the post in and backfill a little bit of soil so the post can stand up on its own. Again, make sure it is against your stringline or guide wire and perpendicular to the ground (at 90 degrees on flat ground, or at an angle on a slope). Assuming you are on a flat ground, use your level to get it straight – check two sides, then backfill and ram it in stages, always checking (and correcting) the levels as you go. Sometimes you may need to give a post a little tap with a hammer to get it back to level if your back-filling takes it out of level.
Don’t: skimp on the depth of a post hole – to get a uniform post height of 1200mm above the ground, some posts may need to be slightly deeper or slightly shallower than 600mm, as sometimes posts can be just under or over 1800mm long. Always measure and check.
Don’t: use these instructions to put in a strainer post – strainer posts need special care and attention, and itís always better if you can get them rammed.
Do: choose the right posts. Fencing contractor Tim Pope says one of the common problems he sees is people choosing the wrong posts for the job.
Do: ram the backfill in firmly, especially at the bottom and top of the posts, and don’t hurry the job as a little care now will mean a stronger post in the ground.
CHOOSE YOUR POSTS CAREFULLY
When you have a lot of fencing to do, the dollars soon add up, so it can be very tempting to think you can save money by choosing smaller sized posts. However, it’s almost certainly a false economy if you have strong livestock such as cattle, horses or even pigs.
Strainer post diameter 200-225mm, for use at beginning and end of a straight run of fence, holds the strain of the fencing wire and/or gates.
No 1 posts diameter varies from 115-135mm, standard fencing posts, compulsory on boundary fences and are the most common fencepost generally used.
No 2 posts diameter varies from 90-115mm, usually used as a ‘stay’ or ‘angle’ to support a strainer post.
No 3 posts diameter varies from 65-90mm, for fences holding in smaller stock only, or in some cases where you are using untensioned electric wires.
“A No 3 post is a very small post,” says Tim. “If you have 2-3 year old cattle, all they have to do is brush or fall against a post like that and it will snap off. You’ve got to use the right materials.”
2. PUT IN A STRAINER POST STAY
A strainer post may be big and heavy but the weight and tension of a fence means it requires support. A stay or angle is a special post that stops a strainer post from being pulled over.
1. Select your stay – usually this is a No 2. round post (not a half round as they’re not strong enough says Tim) from 2.4m long, although Tim prefers using a 2.7m long post.
2. Trim one end to a point.
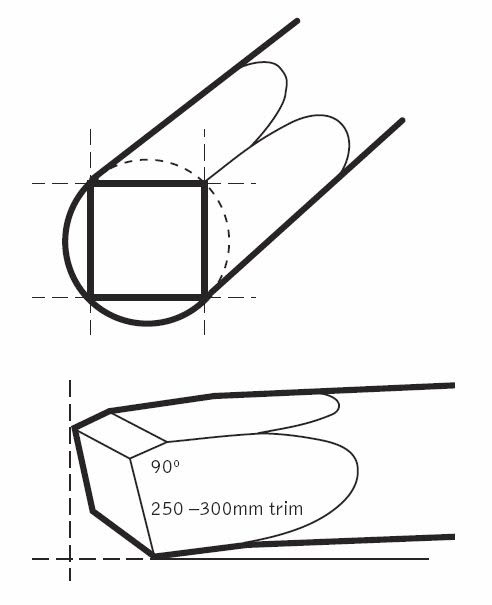
3. A stay should sit at the halfway point of a strainer post, or ever so slightly higher or lower depending on where your wires will sit – never have it sitting any lower otherwise it just acts as a lever, helping to push the strainer up out of the ground over time. Any higher means it is not as strong. It should also be in line with your guide wire or string line; if it is off slightly, it can twist the strainer post over time.
4. Mark on your strainer post where the stay will sit so you can create a mortice (an inset) in the wood to hold it in place.
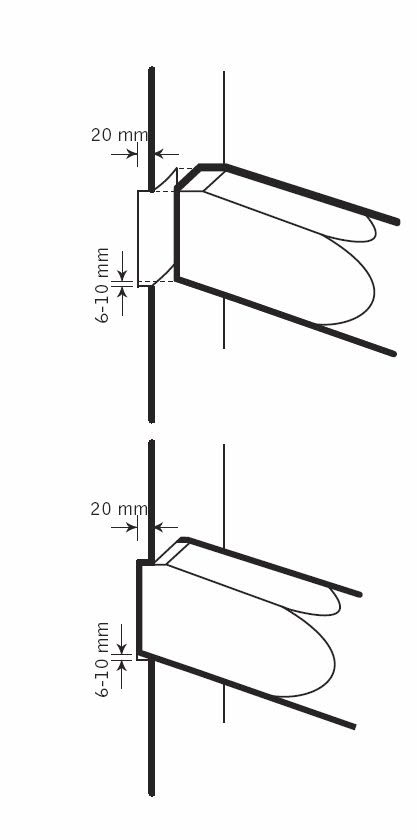
You will need a hammer and chisel to cut into your strainer to form this mortice (show above, cutting in about 20mm all the way around. Don’t use a chainsaw.
5. Now your stay is sitting in position, mark out and dig the trench for the stay block. A stay block is a half round post, cut to at least 900mm in length (or longer if the ground is soft) that sits at right angles to the stay in a trench 200mm deep.
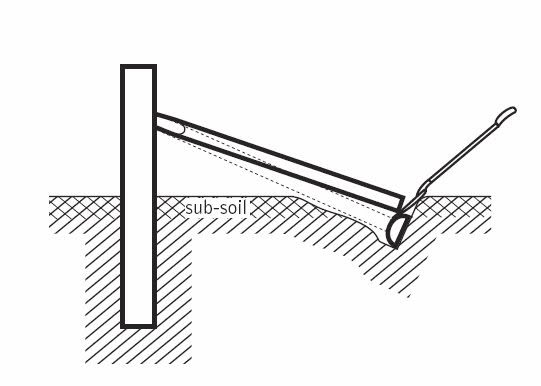
You will also need to dig out the soil in front, to allow for the angle of the stay. The stay should hit the stay block right in the middle lengthwise and overlap it by about half the width of the stay block. You will then need to lever it into place using a spade, and you might need help with this, one person to lever, one person to tap the stay down so it fits tightly against the stay block. Cover and firm soil over stay trenches.
Don’t: backfill the stay block trench with soil if you cut it back too far; instead, cut it back a bit further until you have room to insert another stay block behind it.
3. HOW TO TIE OFF A WIRE ON A POST
This is the nice, neat and strong way to tie off a wire around a post. Note the photos taken were for demonstration purposes only.
1. Put wire around post and cross over.
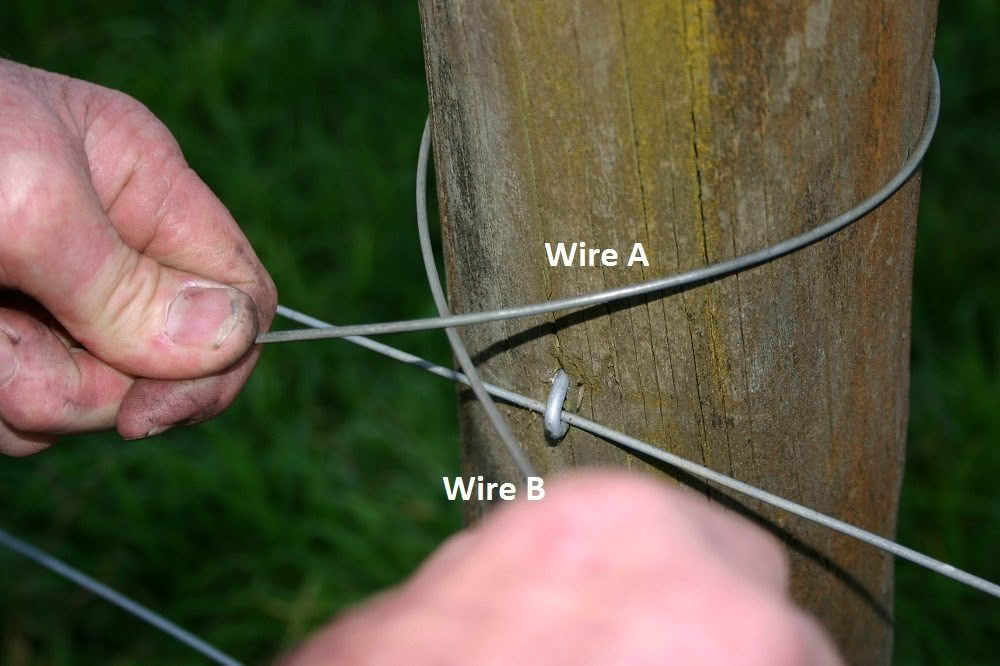
2. Take wire A that is going under and bend it over wire B.
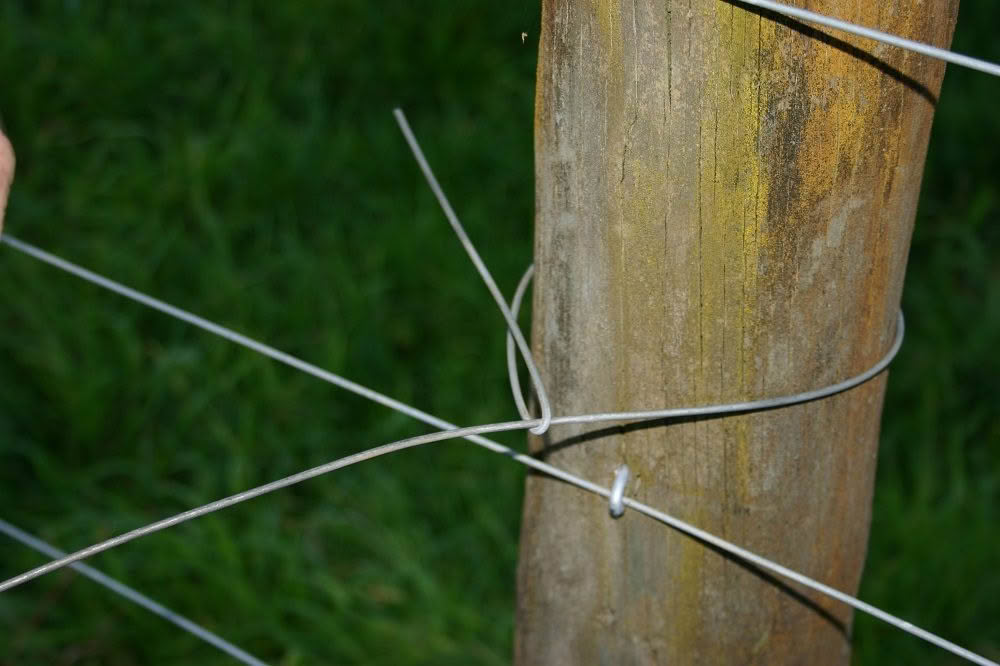
3. Tuck wire A under itself.
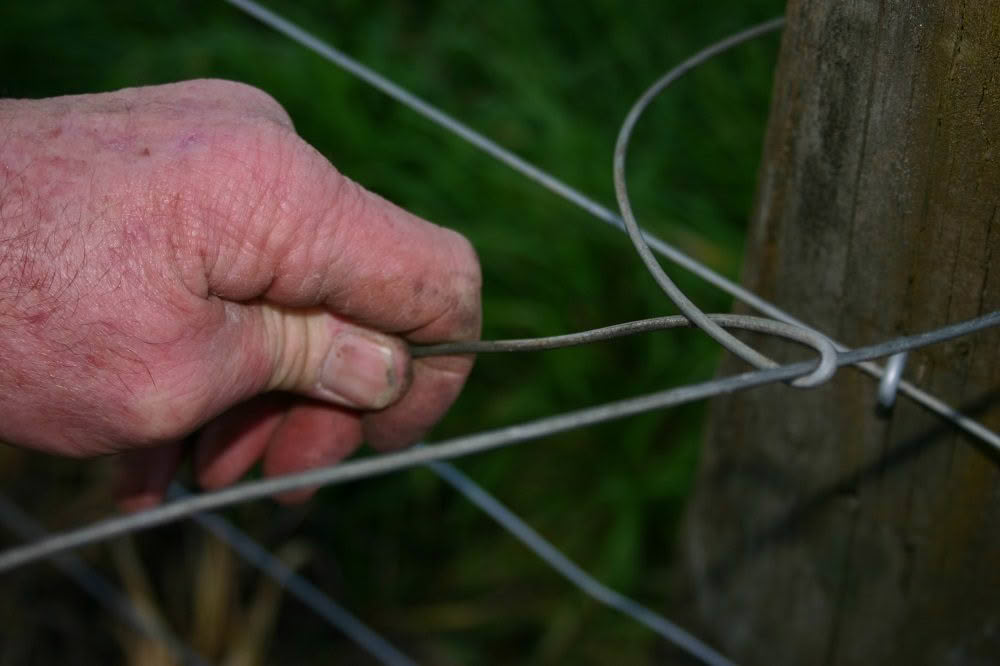
4. Pull wire A so it is at 90 degrees to wire B (below left) which will make it is easier to twist, then bend it up and back over wire B (below right).

5. Continue to twist wire A two or three times – it will snap off neatly.

4. HOW TO JOIN TWO WIRES (REEF KNOT)
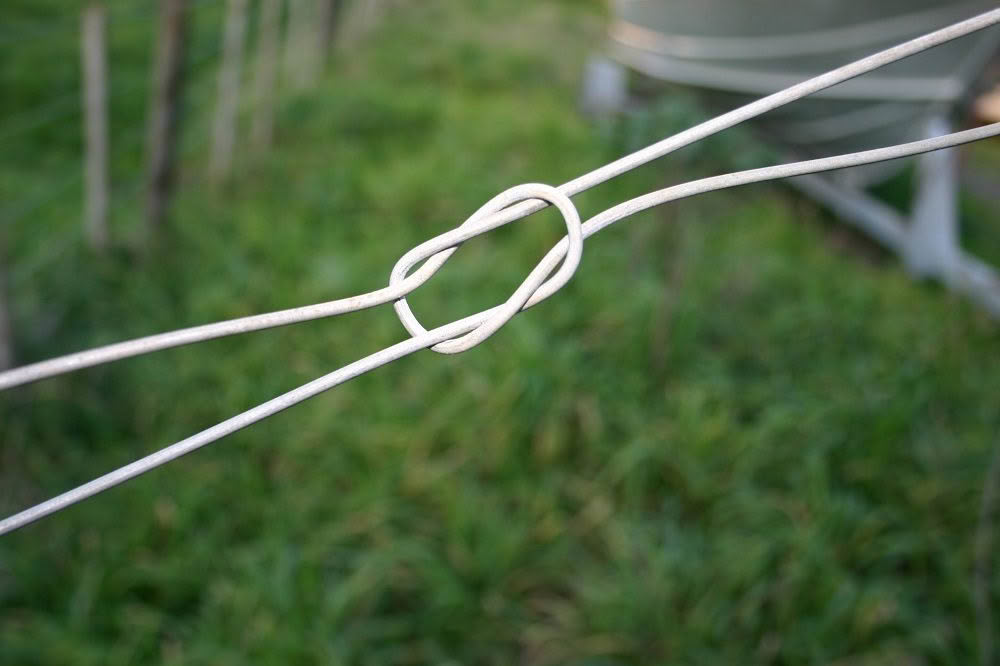
If a wire fence has snapped or you run out of wire part-way through running a fence line, the reef knot is an easy and strong way to create a join, taking up to 440kgf (kilograms of force) according to NZ steel wire manufacturer Pacific Wire, makers of WIREMARK.
1. Bend the ends of your wire to form hooks.
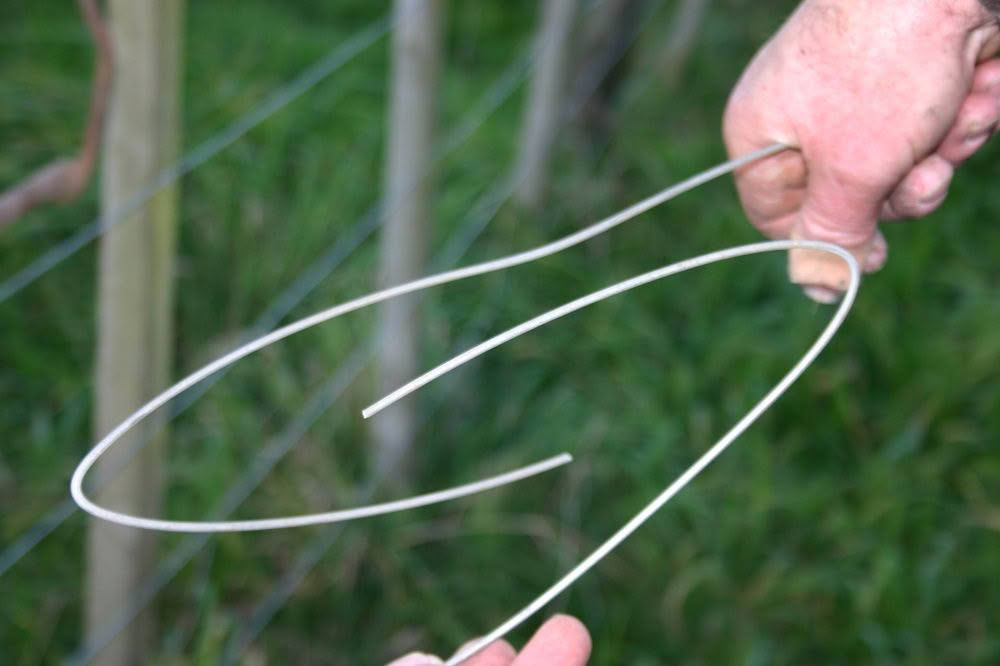
2. Bend the end of each hook to form a second hook, then twist through the opposing wire.
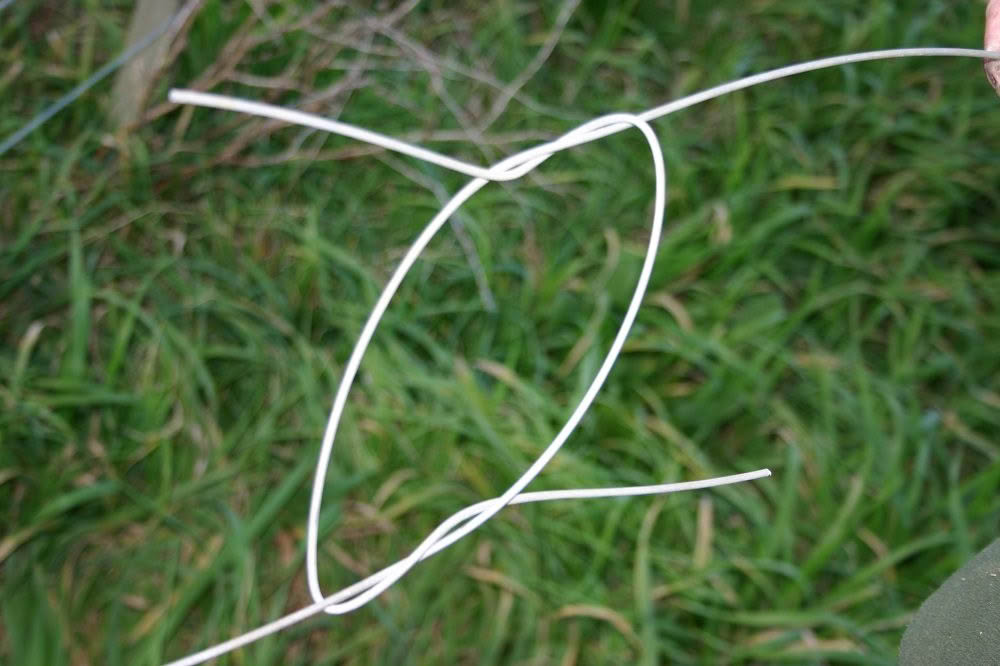
3. Slowly pull the two ends of the wire – it will tighten to form a reef knot.
5. HOW TO NAIL UP BATTENS (AND STOP THEM FROM SLIDING)
Nailing up battens is back-breaking work, especially if you’re working alone – we highly recommend a batten holder, or for really long runs of fence, a contractor with an air compressor and a staple gun for the job. When considering the finances, take into account the physical savings.
1. Lay out your battens, about one metre apart.
2. It helps if you have an assistant who can stand on the other side of the fence to hold each batten in place (the top of the batten should be 50mm above the top wire) and to act as a backstop. If you have one, get them to hold something like a long piece of wood behind it.
However, it is a very jarring process – you can jam a batten in place using your knee to get the top wires in, but it depends on how much you like your knee (and your back). A batten holder is a cheap way of holding a batten in place.
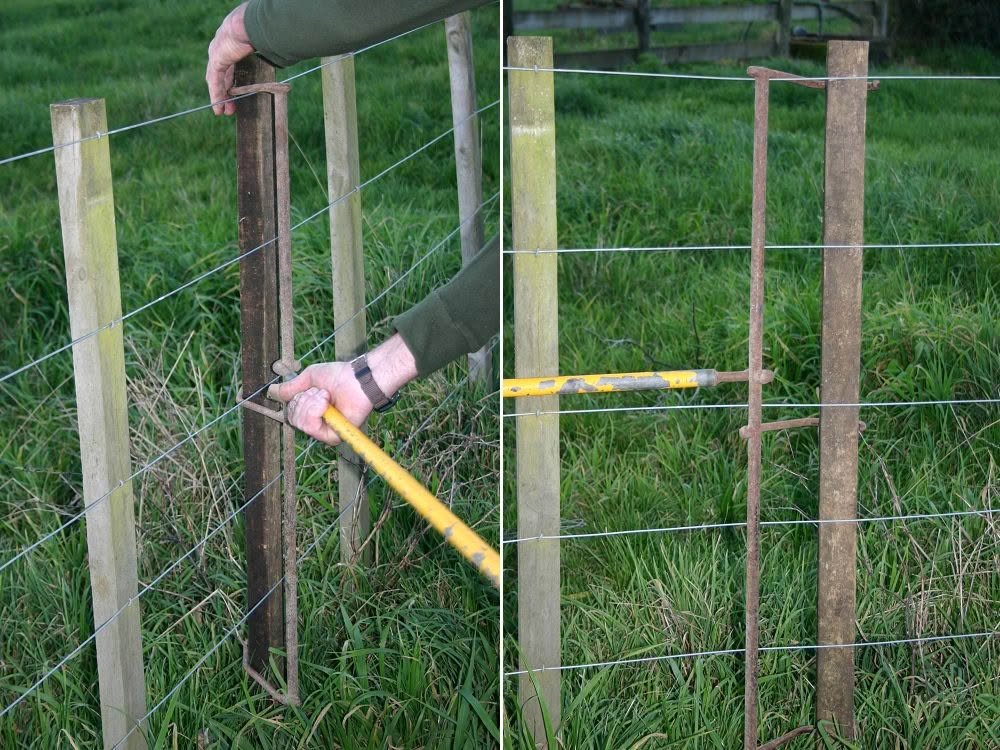
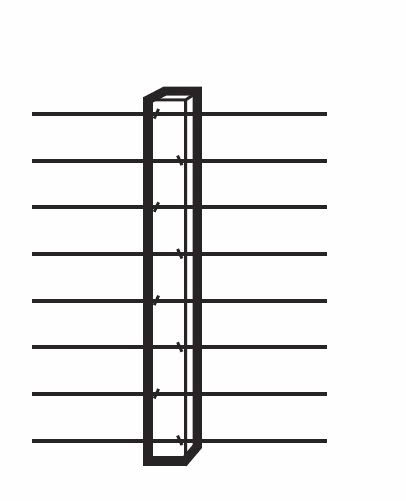
4. Staple battens in a staggered pattern, with each staple skewed in alternate directions. This stops battens sliding along the wires, twisting off or splitting when you hammer them in.
7 FENCING TIPS FOR THE BEGINNER
1. Get help
Enlisting the help of a spouse or friend is an important step – any fencing job is certainly much easier with another pair of hands.
2. Always use the right wire
It can seem confusing when you see all the different types of wire at your local rural supply store. The most common fencing wire is 2.5mm, high tensile (HT), galvanised steel wire; however, if you live in an area with high sulphur or salt levels, 3.15mm or 4mm HT extra heavy galvanised steel wire is recommended.
3. Don’t use an old post rammer
Tractor-mounted post rammers aren’t nicknamed ‘widow-makers’ for nothing. If you’re tempted to buy an old one for your tractor, fencing contractor Tim Pope strongly advises against it. Newer ones have more safety features and won’t be as worn or as compromised as older units can be.
4. Don’t eyeball a fence line
Creating a straight and level fence line by eye is not possible for most people. It’s always good practice to set up your string lines at the start so you can ensure a flowing, level fence line. The only exception may be a fence that needs to go around a lot of obstacles or over steep and uneven ground, but even then fencing contractors will try to use a string line or guide wire as much as possible.
5. Putting on battens the easy way
Having put on battens the hard way, I can highly recommend a batten holder, which you can buy at rural supply stores on or Trade Me. Placed behind a batten, it holds it firmly in place when you put your leg/hip weight against the lever (the handle). If you’re handy with a welder, you can probably easily make one.
6. How to curve a fence line
If you need to curve a wire fence, always do it gently, to avoid having to use a strainer post – if it’s too sharp, it’s going to move says fencing contractor Tim Pope.
“I do a curve in 6-8 posts, a gentle curve; if it’s three wire electric, just change your wires from one side to the other side of the posts so the pressure is evened out.”
7. How to avoid a saggy gate
Nail a small piece of wood to a post at the opening end so the gate rests on it when it’s shut, to relieve pressure on the hinge post and hinges.
8. What to do if a fence crosses wet/swampy soil
If you can’t fence around a wet or swampy area, consider using longer posts (2.4m, 2.7m or more) and get a contractor to ram them in – they will be able to drive in on a tractor (depending on the area) and ‘feel’ a post bite into firmer ground below.
Love this story? Subscribe now!
 This article first appeared in NZ Lifestyle Block Magazine.
